The RollerCoin Expedition system is one that is always seeing new evolutions from the way things work to the rewards that are granted for sending hamsters out for treasures. One of the biggest questions people often ask regarding this system is: What are the best stats for RollerCoin hamsters? The answer may surprise you, too, considering there's misinformation even on RollerCoin's own site as to how the Expedition system works (it's not kept updated properly).
The Previous Method of Success Calculations
The way the Expeditions used to work was that each stat was attuned to specific expeditions, with most of them requiring specific thresholds in two stats. At this point, the question wasn't so much "what are the best stats for hamsters" but rather "what are the best stats for the hamsters I'm using in the Expeditions I want to run?" Luckily, they changed this method a while ago so that it would be much more transparent for players, breaking apart from the previous convoluted system.
I'll also add in that they supposedly used to use Health as a basis for whether or not you'd die, but I joined later than this so I'm unable to confirm this detail myself. I can, however, confirm the attunements.
The Great Update to RollerCoin Expedition Stats
To help lessen confusion about how the Expeditions work, RollerCoin did something completely unexpected: they made them all equal. Let's use two specific hamsters to show the difference. For this example, we'll use base hamsters, but the same applies to leveling them up and adding points to their pool.
Goodncle: 60 Health, 40 Strength, 80 Luck, 180 Total
Badncle: 60 Health, 80 Strength, 40 Luck, 180 Total
Both of the above hamsters are exactly the same when it comes to expedition success chance. At level 1, that means both hamsters have the same 41.6% base survival chance.
As you level them up, you're able to add new points to their stats, but here's the most important takeaway: you want to base the points on the rewards you want. For the vast majority of hamsters, this means getting stats to 100 when possible. Some players will argue that going for just 95 is better. And some hamsters really can't do much at all (I'm looking at you, The Hamster, with your 99 points total at level 50).
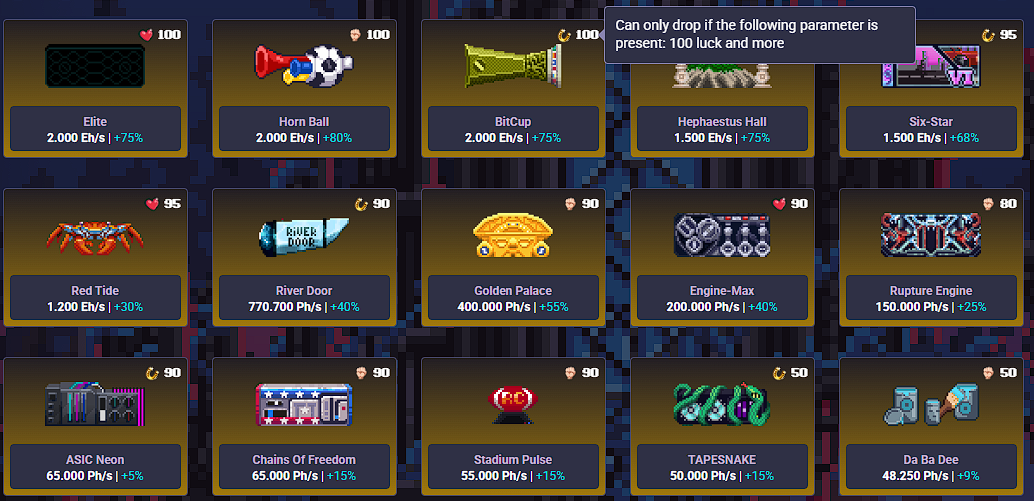
What I'd suggest is to look at the hamster you're using, look up their success chance on our RollerCoin Expedition success chart, and then figure out which missions you're going to want to target the most often. From there, you can look at their reward possibilities. Take a very close look for those that require specific stats, such as here:
Those are examples of rewards that require 100 points of a specific stat. Once you've broken down your goal by expedition and rewards you want, you can then evaluate the hamsters you have to work out the best way to get them to that goal. Do note, however, that the higher rewards do have a much lower chance of being obtained even with 100/100/100 stats, so it's a toss between going for the lottery ticket-style rewards or going for lower rewards that have a much more viable chance. But aside from this, just keep in mind that Health does not grant higher success chance and Luck does not mean you have a better chance of good rewards. All that matters is the overall stats for success and the specific thresholds for specific rewards in each individual Expedition.
Pending Feature: The Hamster Gym!
There are some new things coming soon that are supposed to help with this as well, such as the RollerCoin Hamster Gym, although we don't have much information about those yet. That will be added to this guide once more is known!